Building MCP Servers the Easy Way with Apache OpenServerless
It’s 2025, and apparently, if your infrastructure isn’t running on MCP servers, are you even in tech? From stealth startups to sleepy enterprises pretending to innovate, everyone claims to be “built on MCP” — or at least wishes they were. It’s the new badge of modernity.
In this guide, I’ll show how to build an MCP-compliant server using Apache OpenServerless and our custom MCP plugin. By deploying OpenServerless and using the plugin, you can quickly expose tools via the Model Context Protocol (MCP). This setup enables fast and portable AI workflows across any cloud or on-prem environment.
The hard part about running an MCP Server
Spinning up an MCP server sounds cool and it looks easy. But the real pain doesn’t start until after the “hello world” works. Because running an MCP server isn’t the challenge — it’s keeping it running and updating it.
Want to make it available on the Internet? Prepare for a joyride through SSL, firewall configs, and reverse proxies. Thinking of scaling it? That’s when the fun begins: orchestration, autoscaling, persistence, model versioning, billing — suddenly you’re less “AI pioneer” and more “distributed systems janitor.”
This is where OpenServerless with MCP truly shines: enabling fast, portable, and secure AI tool deployment with zero DevOps, seamless orchestration, and full compliance with the Model Context Protocol.
Introducing olaris-mcp, the OpenServerless plugin to build MCP servers
We developed an Apache OpenServerless plugin, or more precisely an ops plugin for building MCP servers with Apache OpenServerless functions. A quick reminder: ops is the CLI and it supports plugins as a way to extend the CLI with new commands.
This plugin allows you to create an MCP-compliant server in a fully serverless way—by simply writing functions and publishing them to OpenServerless.
The plugin can run locally for development or be deployed to any server for production use. We support both local and public (published on the Internet) MCP servers. We will cover the latter in a future article as it enables interesting scenarios like inter-servers communications to be explored.
Note: In OpenServerless, a single MCP server consists of a number of functions, so one single MCP server is a package. It consists of a collection of tools, prompts, and resources, each represented as a distinct OpenServerless function. That means one server is always split into a number of microservices.
Installing the MCP Plugin for OpenServerless
As we said, it’s an ops plugin and can be installed directly using:
$ ops -plugin https://github.com/mastrogpt/olaris-mcp
To verify that the plugin has been installed correctly, run:
$ ops mcp
You should see the following usage synopsis (shortened):
Usage:
mcp new <package> [<description>] (--tool=<tool>|--resource=<resource>|--prompt=<prompt>|--clean=<clean>) [--redis] [--postgres] [--milvus] [--s3]
mcp run <package> [--sse]
mcp test <package> [--sample] [--norun]
mcp install [<package>] [--cursor] [--claude] [--5ire] [--uninstall]
mcp inspect <package> [--sse]
Let’s see in detail what the available commands do:
ops mcp new– Create a new MCP package tool, prompt or resource.ops mcp run– Run the specified package as an MCP server.ops mcp test– Test the generated MCP server via CLI.ops mcp inspect– Launch the MCP web inspector for the specified package.ops mcp install– Install or uninstall the MCP server locally to Cursor, Claude, or 5ire environments.
Creating a new MCP Server with a serverless function
Let’s walk through the steps to create a simple MCP server – for example, one that provides weather information for any location in the world.
We’ll start by creating a serverless function that acts as a proxy using the following command:
$ ops mcp new demomcp --tool=weather
This command initializes a new MCP package named demomcp and defines a tool called weather.
Next, you’ll need to describe your MCP tool using metadata annotations. These annotations define the tool type, description, and input parameters:
#-a mcp:type tool
#-a mcp:desc "Provides weather information for a given location"
#-a input:str "The location to retrieve weather data for"
Implementing a Weather Function
Now it’s time to implement the logic for your weather function.
You can use generative AI to get the required code quickly. For instance, the following prompt can help you generate a simple function that retrieves weather information:
AI Prompt:
A Python function get_weather(location) using requests and open-meteo.com that retrieves the given location, selects the first match, then fetches and returns the weather information for that location.
We do not include the implementation here, ChatGPT typically returns a valid and usable function.
Assuming you’ve implemented a get_weather(location) function, you can now create a wrapper to handle MCP-style invocation:
def weather(args):
    inp = args.get("input", "")
    if inp:
        out = get_weather(inp)
    else:
        out = "Please provide a location to get the weather information for."
    return {"output": out}
Deploy and Test the Function
You can deploy and test your MCP function as follows:
$ ops ide deploy demomcp/weather
ok: updated action demomcp/weather

$ ops invoke demomcp/weather
{
    "output": "Please provide a location to get the weather information for."
}

$ ops invoke demomcp/weather input=Rome
{
    "output": {
        "location": "Rome, Italy",
        "temperature": 26.0,
        "time": "2025-06-22T06:45",
        "weathercode": 2,
        "winddirection": 360,
        "windspeed": 2.9
    }
}

$ ops invoke demomcp/weather input=NontExistingCity
{
    "output": "Could not find location: NontExistingCity"
}
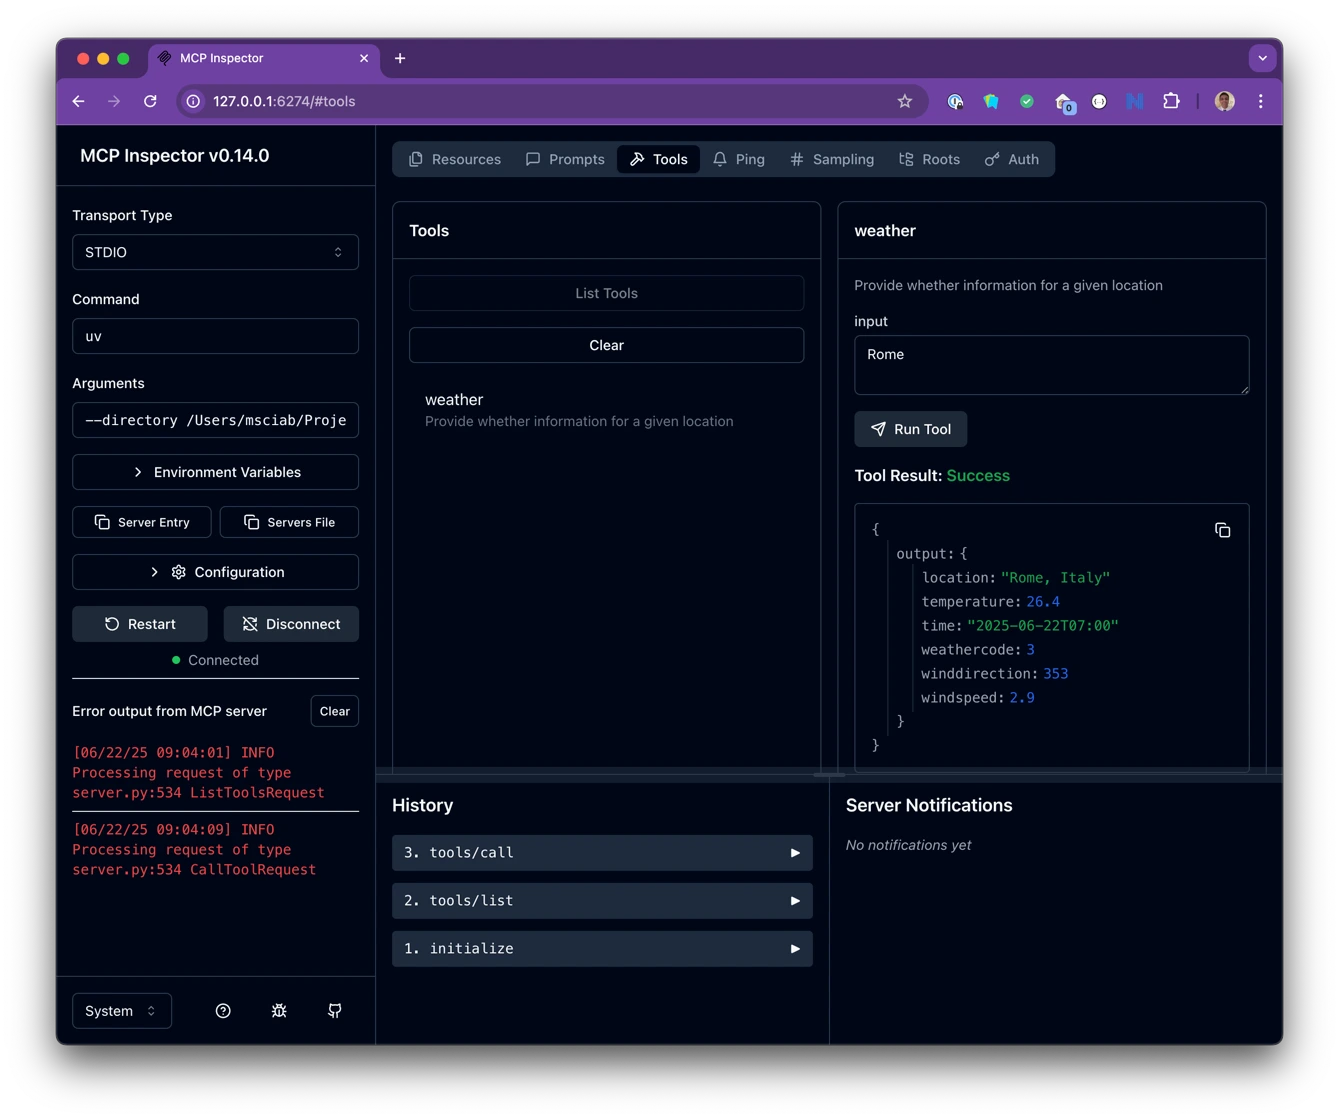
Testing the MCP Server
Your MCP server is now up and running, and you can test it using the graphical inspector with the following command:
$ ops mcp inspect demomcp
The Inspector connects to your MCP server, lists available tools and resources, and allows you to test their behavior interactively.
Using the MCP Server
Your MCP server is now ready to be integrated into any chat interface that supports MCP servers.
In this example, we use 5ire, a free AI assistant and MCP client that provides an excellent environment for running and testing MCP tools.
Step 1: Install the ops CLI
First, install the ops CLI. You can find installation instructions on the OpenServerless installation page.
Step 2: Add the MCP Plugin
Install the MCP plugin using:
$ ops -plugin https://github.com/mastrogpt/olaris-mcp
Step 3: Log in to Your OpenServerless Account
Use the following command to authenticate:
$ ops ide login
Step 4: Install the MCP Server into 5ire
Deploy your toolset to 5ire with:
$ ops mcp install demomcp --5ire
You’re all set! Now you can access your 5ire client and use the deployed MCP server in real conversations.
Let’s walk through how the tool works in practice:
Testing it step-by-step
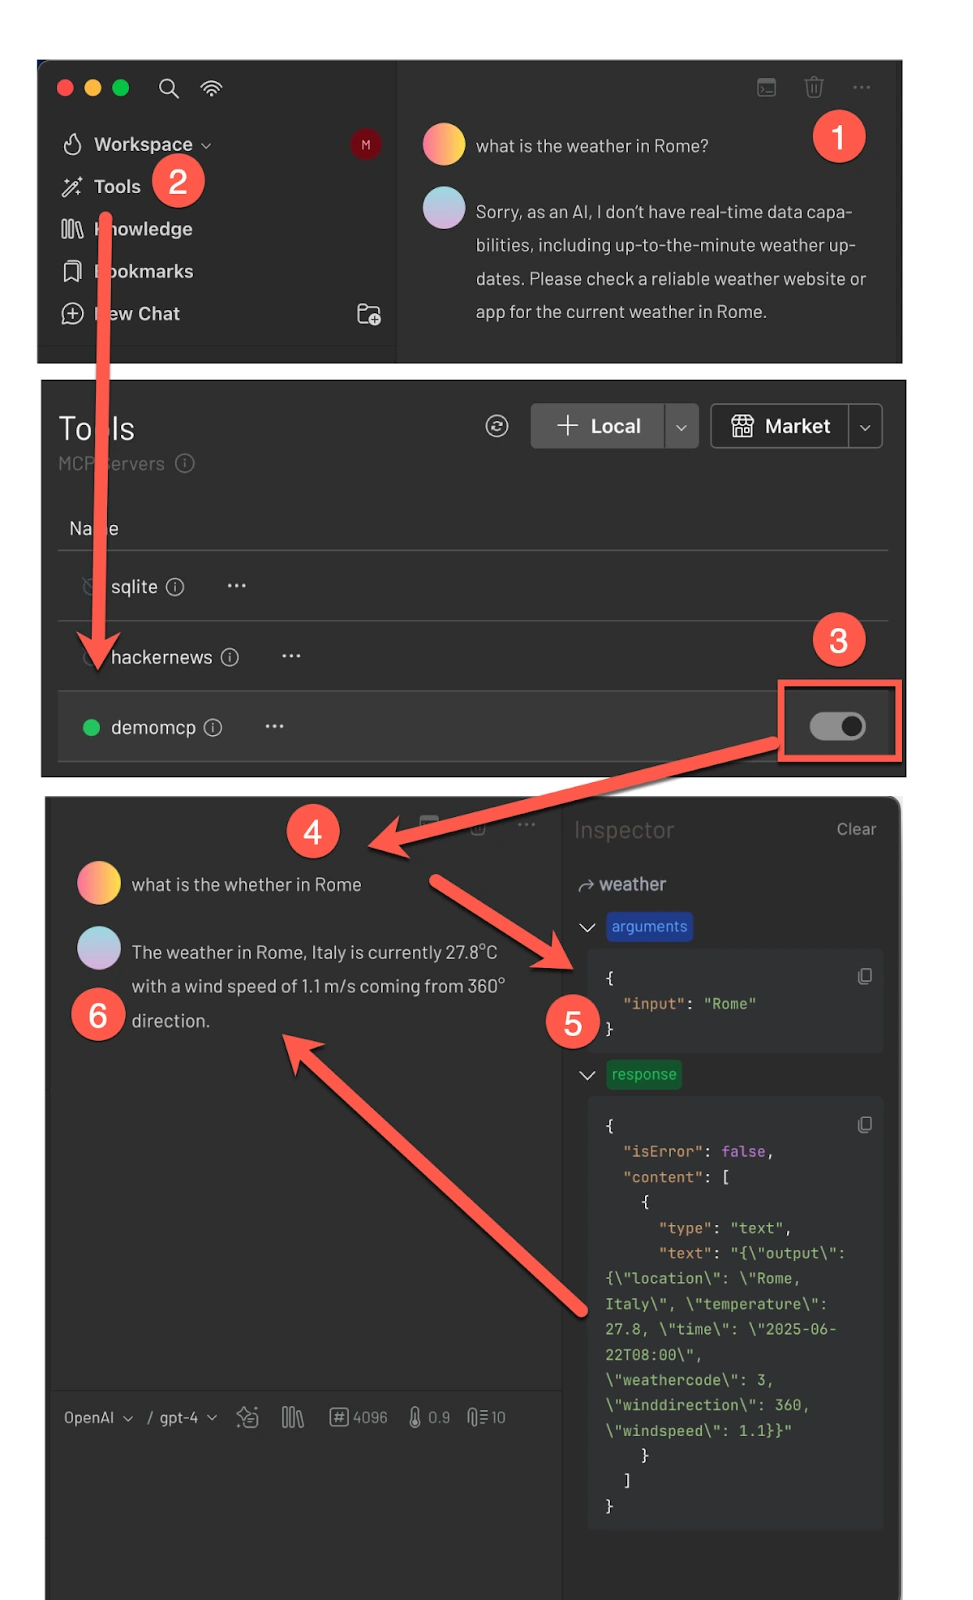
- Ask a Chatbot
Ask a chatbot for the weather in Rome. It will likely reply that, as a language model, it doesn’t have up-to-date weather information. - Open the Tool List
In the 5ire interface, open the list of available MCP tools. - Enable the MCP Tool
Locate your toolset (demomcp) and enable it. - Ask Again
Now that the tool is active, ask the chatbot again: “What’s the weather in Rome?” - Observe What Happens
Behind the scenes, the LLM invokes the MCP server, which triggers the serverless function that retrieves live weather data. - Success!
You’ve successfully extended your LLM to provide real-time weather information for any location in the world.
Conclusion
With Apache OpenServerless, we showed how to build and deploy a serverless MCP server in minutes, bypassing all complex system configuration.
This example covered only local MCP server configuration. However, the optimal solution utilizes public MCP servers, enabling inter-server communication via agent interaction protocols.
This is just the beginning. Public MCP servers open the door to multi-agent interactions, federation, and more.
Stay tuned for more updates from Apache OpenServerless!
Authors

